Name practice ·
Trace, Copy, Write: A Name Practice Worksheet Routine
A tracing row gives a learner a shape to follow. A copying row asks them to use a separate model. A blank row gives them space to write the name without following an outline. Put all three on one page so you can see each kind of attempt.
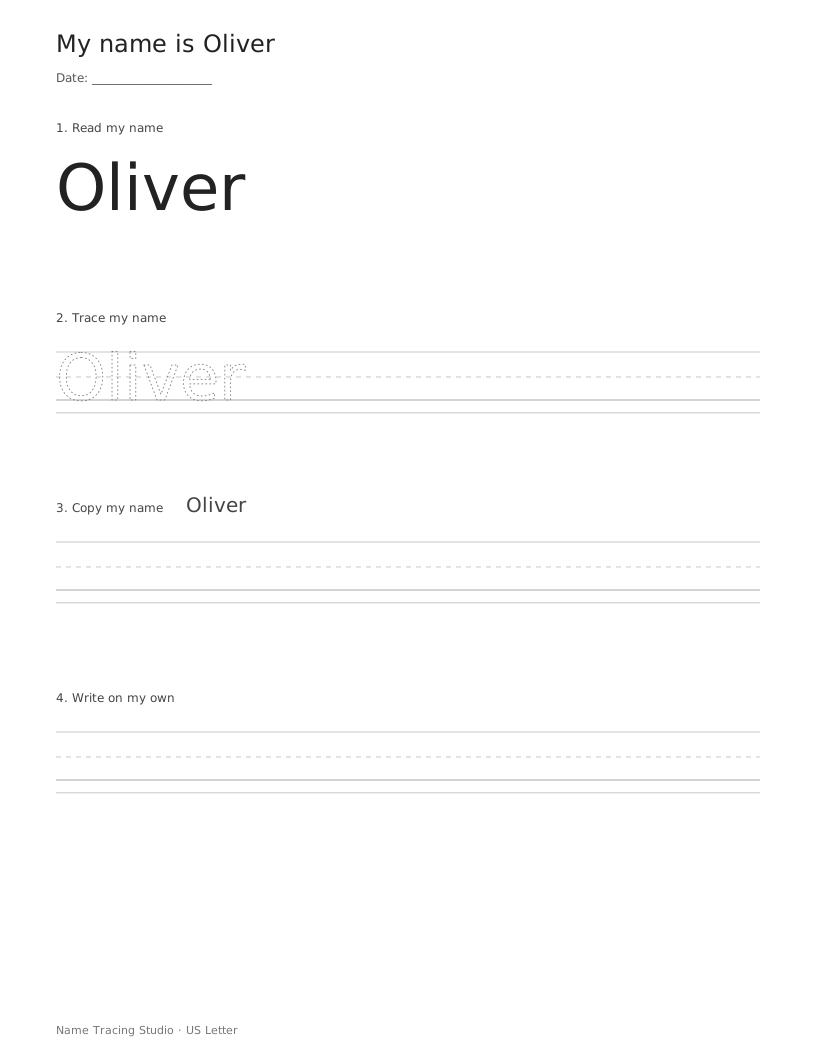
Set up a trace-copy-write name worksheet
Open the name tracing worksheet maker and enter the learner’s name exactly as it should appear. Choose Read → Trace → Copy → Write, one learner per page, and the paper size in your printer. Leave handwriting guides and the date line on. Start with As typed for letter case so the spelling and capitalization stay under your control.
The four-stage template uses a fixed number of rows. The 3, 5 and 7 row settings belong to Repeated tracing rows, a separate template. Use the four-stage page when you want different tasks; use repeated tracing when you want more copies of the same outline.
Use the four rows with Oliver
- Read: point to the solid model, Oliver. Say the name together and point to its letters in order. Keep the model visible during this step.
- Trace: demonstrate the letter movement on separate paper, then invite the learner to follow the printed shapes. The dotted style is a dashed outline, not a stroke-order diagram.
- Copy: use the small Oliver model beside the row label. Ask the learner to write on the guides below it instead of writing over that small model.
- Write: cover the models above the final row with another sheet of paper. Leave only the blank writing row visible for an independent attempt.
Keep the page as a record of the attempt. A traced name, a copied name and an independently written name are different pieces of work; compare the same row across dated pages rather than treating them as interchangeable.
Choose the next page from what you see
If a learner asks for the model on the final row, uncover it and use that row for another copying attempt. Note that it was copied. If one letter needs attention, work on that letter separately before returning to the whole name. There is no need to fill every row in one sitting.
For more space, stay with one learner per page. Two learners per page creates smaller practice areas. A long name also shrinks to fit the available width; changing the letter-size setting does not override that fit. Use the name the learner is practicing, and check the preview before printing.
A simple teacher record
- Date and name spelling used on the worksheet.
- Which rows were traced, copied or written with the models covered.
- One specific observation, such as “left out the second letter” or “copied all six letters in order.”
- One task for the next session, such as copying Oliver with the model visible.
Common setup questions
Can I print only tracing rows?
Yes. Choose Repeated tracing rows and set Write on your own to No blank rows. Select 3, 5 or 7 tracing rows.
Does the page teach pencil stroke order?
The outlines show letter shapes. Use your school’s letter-formation model to demonstrate starting points and direction. Match that model to the printed font before the lesson.